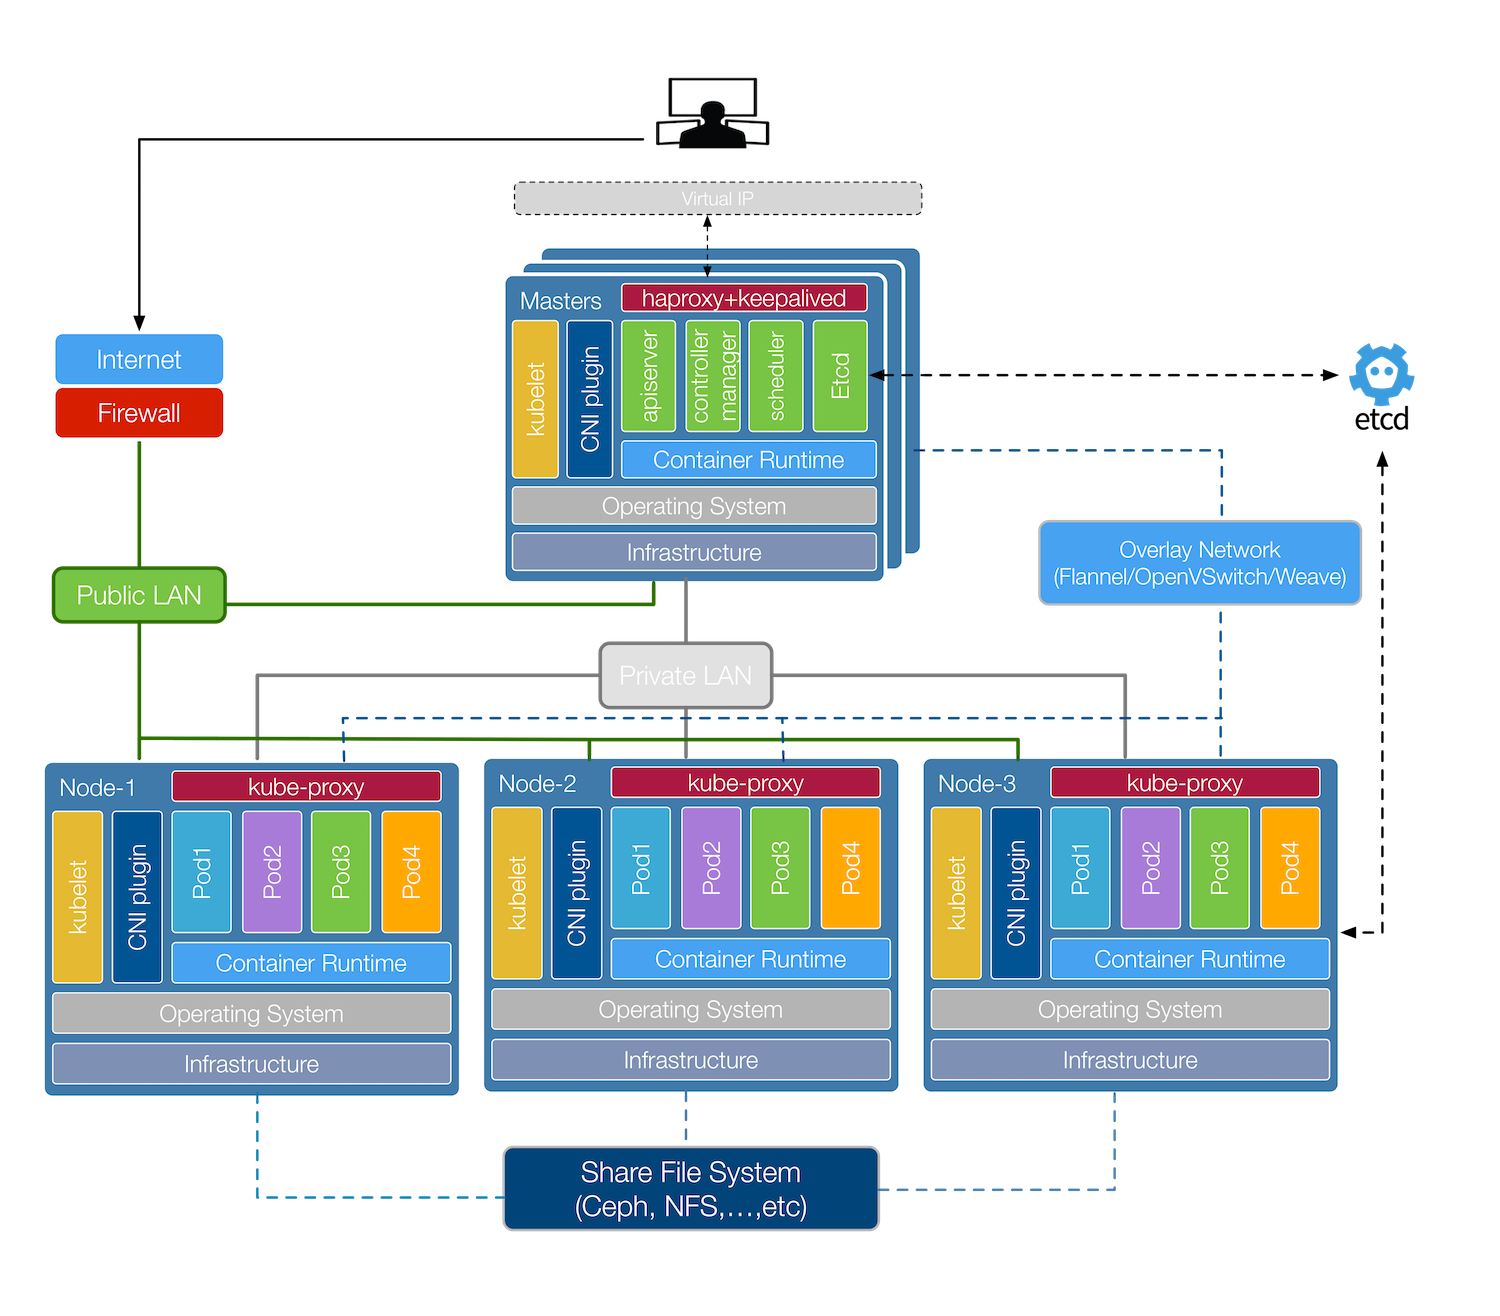
1. 环境准备
1.1. 环境介绍
软件版本
- Kubernetes v1.13.5 (v1.13.4有kubectl cp的bug)
- CNI v0.7.5
- Etcd v3.2.24
- Flannel v0.11.0 或者 Calico v3.4
- Docker CE 18.06.03
网络信息
- Cluster IP CIDR: 10.244.0.0/16
- Service Cluster IP CIDR: 10.96.0.0/12
- Service DNS IP: 10.96.0.10
- DNS DN: cluster.local
- Kubernetes API VIP: 10.0.6.155
- Kubernetes Ingress VIP: 10.0.6.156

1.2. 节点信息
本文采用 CentOS 7.6 系统版本
| IP | Hostname | CPU | Memory | |
|---|---|---|---|---|
| 192.168.8.207 | k8s-m1 | 4 | 2G | |
| 192.168.8.208 | k8s-m2 | 4 | 2G | |
| 192.168.8.203 | k8s-m3 | 4 | 2G | |
| 192.168.8.204 | k8s-n1 | 4 | 2G | |
| 192.168.8.205 | k8s-n2 | 4 | 2G | |
| 192.168.8.206 | k8s-n3 | 4 | 2G |
VIP: 192.168.8.200 ,所有 Master 节点采用 keepalived+haproxy 保持高可用
- 所有操作以
root执行- 高可用一般建议大于等于3台的奇数台,我使用3台master来做高可用
1.3. 环境初始化
- 所有机器 网络互通,
k8s-m1可以免密码登录其他节点 -
关闭所有防火墙和
SELinuxsystemctl disable --now firewalld NetworkManager setenforce 0 sed -ri '/^[^#]*SELINUX=/s#=.+$#=disabled#' /etc/selinux/config -
关闭
dnsmasqsystemctl disable --now dnsmasq -
Kubernetes v1.8+要求关闭系统Swap,若不关闭则需要修改kubelet设定参数( –fail-swap-on 设置为 false 来忽略 swap on),在所有机器使用以下指令关闭swap并注释掉/etc/fstab中swap的行:
swapoff -a && sysctl -w vm.swappiness=0 sed -ri '/^[^#]*swap/s@^@#@' /etc/fstab -
a
  #!/bin/bash
  #set -e
  #
  # Desc: K8S
  # CreateDate: 2019-04-25 16:30:10
  # LastModify:
  # Author: Environment
  #
  # History:
  #
  #
  # ---------------------- Script Begin ----------------------
  #

  # 第一步初始化
  init_step_1(){
      # 关闭 防火墙 SELinux
      systemctl disable --now firewalld NetworkManager
      setenforce 0
      sed -ri '/^[^#]*SELINUX=/s#=.+$#=disabled#' /etc/selinux/config

      # 关闭dnsmasq
      systemctl disable --now dnsmasq

      # 关闭 swap
      swapoff -a && sysctl -w vm.swappiness=0
      sed -ri '/^[^#]*swap/s@^@#@' /etc/fstab

      # 安装perl
      [ ! -f /usr/bin/perl ] && yum install perl -y

      # 安装elrepo 的yum 源
      rpm --import https://www.elrepo.org/RPM-GPG-KEY-elrepo.org
      rpm -Uvh http://www.elrepo.org/elrepo-release-7.0-3.el7.elrepo.noarch.rpm

      # 安装最新内核
      yum --disablerepo="*" --enablerepo="elrepo-kernel" list available  --showduplicates | grep -Po '^kernel-ml.x86_64\s+\K\S+(?=.el7)'
      yum --disablerepo="*" --enablerepo=elrepo-kernel install -y kernel-ml{,-devel}

      # 修改内核启动顺序
      grub2-set-default  0 && grub2-mkconfig -o /etc/grub2.cfg

      # 确认下是否启动默认内核指向上面安装的内核
      grubby --default-kernel

      grubby --args="user_namespace.enable=1" --update-kernel="$(grubby --default-kernel)"

      touch init_step_1.lock

      reboot
  }

  # 第二步 环境变量初始化
  init_step_2(){
      # 开机加载的内核模块
      :> /etc/modules-load.d/ipvs.conf
      module=(
      ip_vs
      ip_vs_rr
      ip_vs_wrr
      ip_vs_sh
      nf_conntrack
      br_netfilter
        )
      for kernel_module in ${module[@]};do
          /sbin/modinfo -F filename $kernel_module |& grep -qv ERROR && echo $kernel_module >> /etc/modules-load.d/ipvs.conf || :
      done
      systemctl enable --now systemd-modules-load.service

      # 设置系统参数
      cat <<EOF > /etc/sysctl.d/k8s.conf
  # https://github.com/moby/moby/issues/31208
  # ipvsadm -l --timout
  # 修复ipvs模式下长连接timeout问题 小于900即可
  net.ipv4.tcp_keepalive_time = 600
  net.ipv4.tcp_keepalive_intvl = 30
  net.ipv4.tcp_keepalive_probes = 10
  net.ipv6.conf.all.disable_ipv6 = 1
  net.ipv6.conf.default.disable_ipv6 = 1
  net.ipv6.conf.lo.disable_ipv6 = 1
  net.ipv4.neigh.default.gc_stale_time = 120
  net.ipv4.conf.all.rp_filter = 0
  net.ipv4.conf.default.rp_filter = 0
  net.ipv4.conf.default.arp_announce = 2
  net.ipv4.conf.lo.arp_announce = 2
  net.ipv4.conf.all.arp_announce = 2
  net.ipv4.ip_forward = 1
  net.ipv4.tcp_max_tw_buckets = 5000
  net.ipv4.tcp_syncookies = 1
  net.ipv4.tcp_max_syn_backlog = 1024
  net.ipv4.tcp_synack_retries = 2
  # 要求iptables不对bridge的数据进行处理
  net.bridge.bridge-nf-call-ip6tables = 1
  net.bridge.bridge-nf-call-iptables = 1
  net.bridge.bridge-nf-call-arptables = 1
  net.netfilter.nf_conntrack_max = 2310720
  fs.inotify.max_user_watches=89100
  fs.may_detach_mounts = 1
  fs.file-max = 52706963
  fs.nr_open = 52706963
  vm.swappiness = 0
  vm.overcommit_memory=1
  vm.panic_on_oom=0
  EOF
      sysctl --system

      # 安装docker
      export VERSION=18.06
      curl -fsSL "https://get.docker.com/" | bash -s -- --mirror Aliyun

      # 配置docker 加速源
      mkdir -p /etc/docker/
  cat>/etc/docker/daemon.json<<EOF
  {
    "exec-opts": ["native.cgroupdriver=systemd"],
    "registry-mirrors": ["https://fz5yth0r.mirror.aliyuncs.com"],
    "storage-driver": "overlay2",
    "storage-opts": [
      "overlay2.override_kernel_check=true"
    ],
    "log-driver": "json-file",
    "log-opts": {
      "max-size": "100m",
      "max-file": "3"
    }
  }
  EOF

      # 设置docker开机启动,CentOS安装完成后docker需要手动设置docker命令补全
      yum install -y epel-release bash-completion && cp /usr/share/bash-completion/completions/docker /etc/bash_completion.d/
      systemctl enable --now docker

      touch init_step_2.lock

  }

  if [ ! -f init_step_1.lock ];then
      init_step_1
  elif [[ ! -f init_step_2.lock ]]; then
      init_step_2   fi
环境变量
# 声明集群成员信息
declare -A MasterArray otherMaster NodeArray AllNode Other
MasterArray=(['k8s-m1']=192.168.8.207 ['k8s-m2']=192.168.8.208 ['k8s-m3']=192.168.8.203)
otherMaster=(['k8s-m2']=10.0.6.167 ['k8s-m3']=10.0.6.168)
NodeArray=(['k8s-n1']=10.0.6.169 ['k8s-n2']=10.0.6.170)
# 下面复制上面的信息粘贴即可
AllNode=(['k8s-m1']=10.0.6.166 ['k8s-m2']=10.0.6.167 ['k8s-m3']=10.0.6.168 ['k8s-n1']=10.0.6.169 ['k8s-n2']=10.0.6.170)
Other=(['k8s-m2']=10.0.6.167 ['k8s-m3']=10.0.6.168 ['k8s-n1']=10.0.6.169 ['k8s-n2']=10.0.6.170)

export         VIP=10.0.6.155

[ "${#MasterArray[@]}" -eq 1 ]  && export VIP=${MasterArray[@]} || export API_PORT=8443
export KUBE_APISERVER=https://${VIP}:${API_PORT:=6443}

#声明需要安装的的k8s版本
export KUBE_VERSION=v1.13.5

# 网卡名
export interface=eth0

# cni
export CNI_URL="https://github.com/containernetworking/plugins/releases/download"
export CNI_VERSION=v0.7.5
# etcd
export ETCD_version=v3.2.24
2. 建立集群 CA Keys 与 Certificate
在这个部分,将需要产生多个元件的Certificates,这包含 Etcd 、Kubernetes 原件等,并且每个集群都会有一个根数位凭证认证机构(Root Certificate Authority) 被用在认证 API Server 与 Kubelet 端的凭证。
- PS这边需要注意
CA JSON档的CN(Common Name)与O(Organization)等内容是会影响Kubernetes元件认证的。
CNCommon Name,apiserver 会从证书中提取该字段作为请求的用户名 (User Name)OOrganization,apiserver 会从证书中提取该字段作为请求用户所属的组(Group)- CA (Certificate Authority) 是自签名的证书,用来签名后续创建的其他证书。
- 本文使用
openssl创建所有证书
etcd的话推荐下官方的在线工具,有兴趣可以去试试 http://play.etcd.io
2.1. 准备 openssl 证书配置文件
注入IP信息
$ mkdir -p /etc/kubernetes/pki/etcd

$ cat > /etc/kubernetes/pki/openssl.cnf <<EOF

[ req ]
default_bits = 2048
default_md = sha256
distinguished_name = req_distinguished_name

[req_distinguished_name]

[ v3_ca ]
basicConstraints = critical, CA:TRUE
keyUsage = critical, digitalSignature, keyEncipherment, keyCertSign

[ v3_req_server ]
basicConstraints = CA:FALSE
keyUsage = critical, digitalSignature, keyEncipherment
extendedKeyUsage = serverAuth

[ v3_req_client ]
basicConstraints = CA:FALSE
keyUsage = critical, digitalSignature, keyEncipherment
extendedKeyUsage = clientAuth

[ v3_req_apiserver ]
basicConstraints = CA:FALSE
keyUsage = critical, digitalSignature, keyEncipherment
extendedKeyUsage = serverAuth
subjectAltName = @alt_names_cluster

[ v3_req_etcd ]
basicConstraints = CA:FALSE
keyUsage = critical, digitalSignature, keyEncipherment
extendedKeyUsage = serverAuth, clientAuth
subjectAltName = @alt_names_etcd

[ alt_names_cluster ]
DNS.1 = kubernetes
DNS.2 = kubernetes.default
DNS.3 = kubernetes.default.svc
DNS.4 = kubernetes.default.svc.cluster.local
DNS.5 = localhost
IP.1 = 10.96.0.1
IP.2 = 127.0.0.1
IP.3 = 192.168.8.200
IP.4 = 192.168.8.203
IP.5 = 192.168.8.204
IP.6 = 192.168.8.205
IP.7 = 192.168.8.206
IP.8 = 192.168.8.207
IP.9 = 192.168.8.208

[ alt_names_etcd ]
DNS.1 = localhost
IP.1 = 127.0.0.1
IP.2 = 192.168.8.203
IP.3 = 192.168.8.200
IP.3 = 192.168.8.207
IP.4 = 192.168.8.208

EOF
生成证书